Wi-fi connected but no internet mac troubleshooting

It is a bit frustrating when you want to send and email or watch a trailer on youtube or whatever it is and you can’t connect. it looks we can’t live without it anymore :)
Here are steps that would help you to figure out what has went wrong when you are in such scenarios. We will start from the obvious ones..

1. Are you on the right wi-fi? Yea it looks obvious but mac being smart and remembering wi-fi spots you might be on the wrong one.. so give it a check

2. Is that only your mac that is not connected to the internet? Check your other gadgets have internet from the wi-fi you are trying to connect. If others can’t make it then the concern would be changed to the source.

3. Restart your router. Usually, most routers have reset button. Reset it, unplug the power and let it be like that for a couple of minutes and check again.

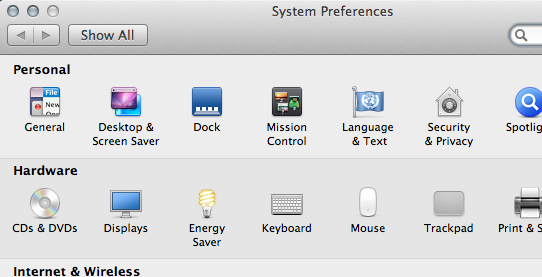
4. Click on the apple icon on the top left, and click System Preferences. Then select network. On the left you would see your Wi-Fi being listed. Click on it and on the right window, turn wi-fi off and click again to make it on. Then select the network from the drop down list. This one would be usually used for when you see the exclamation point on the Wi-Fi icon

5. Try the wireless diagnostics. You can access, click on the Wi-Fi icon on the right top cornet while holding the option button. It will be listed on the bottom of the list. Follow the wizard and see if that helps the problem.

6. See if you IP is accessible from other machines. If you have another computer, it could be windows or linux use the ping command to check if your ip-address is accessible and valid. On windows, open the command prompt and write ping ip.address.here. You can get the ip address of your mac from System preference->network then click on the Wi-Fi. You will see it on the right pane. Say your ip address is 192.168.2.3

ping 192.168.2.3

7. If the step number is shows you the ip-address has the problem, change the range of ip-addresses from your router to force a distribution of new ip-addresses to your devices. Please google how to assign the ip-range on your router using your router brand. The default we accessible router configuration would be http://192.168.0.1. try that on your browser or check what it is from the manual and update accordingly..

Good luck!

Serve more than one site using virtualhosts on mac OSX

There would be a need for this or that reason to serve more than one site from apache. And this is quite possible using configuration inside the apache

First thing first
go to the apache config, by default it should be

/etch/apache2/apache.conf

And search for

#Include /private/etc/apache2/extra/httpd-vhosts.conf

Which, as you can see, is commented. Hence uncomment that by deleting the # infront of it.

The above task will allow us to mess around the httpd-vhosts.conf file that is in the extras directory.

Lets assume we have a site names siteVH which is residing in the directory /www/sitevh
and lets assume we have another site called siteAnother residing in director /www/siteanother

Now the goal is to access those sites independently. So we will create two different virtual hosts for each one and be able to access them independently


    ServerAdmin youreamil@domain.com
    DocumentRoot "/www/siteVH"
    ServerName sitevh.com
    ServerAlias local.site
    ErrorLog "/private/var/log/apache2/sitevh.log"
    CustomLog "/private/var/log/apache2/sitevh.com-access_log" common
    
        AllowOverride All
        Order allow,deny
        Allow from all
        Options Indexes FollowSymLinks
    

And the we will have the same duplicate values for the other one as well.

Then update the /etc/hosts to let know our local “DNS” :) to know what to do

127.0.0.1 sitevh.com siteanother.com

This shall take care of the whole thing.
One more thing, restart apache

sudo apachectl restart

installing macports

If you are a programmer/developer one thing you would face on date to date basis is handling packages.
Macports is a package manager for mac using that simplifying the installation of free/open softwares on you mac.
All how to install procedure is found on http://www.macports.org/install.php
After installing the macports don’t forget to update it

sudo port -v selfupdate

Installing PEAR in Mac OSX

It looks the days of PEAR are somehow covered by the era of composer. But, still there might be things we will depend on PEAR, hence we have to install it.

Are you on Mac OSX and wants to install PEAR.. follow these simple steps and you will nail it

1. download the phar file from go-pear.phar

curl -O http://pear.php.net/go-pear.phar

2. Then run the phar file

sudo php go-pear.phar

In some cases, you might want to run it with -d detect_unicode=0 option
3. You will be provided with option that would look like the following:

1. Installation base ($prefix)                   : /Users/gullele/pear
 2. Temporary directory for processing            : /tmp/pear/install
 3. Temporary directory for downloads             : /tmp/pear/install
 4. Binaries directory                            : /Users/gullele/pear/bin
 5. PHP code directory ($php_dir)                 : /Users/gullele/pear/share/pear
 6. Documentation directory                       : /Users/gullele/pear/docs
 7. Data directory                                : /Users/gullele/pear/data
 8. User-modifiable configuration files directory : /Users/gullele/pear/cfg
 9. Public Web Files directory                    : /Users/gullele/pear/www
10. Tests directory                               : /Users/gullele/pear/tests
11. Name of configuration file                    : /Users/gullele/.pearrc

Select 1 and enter where you would want to put the installation. In my case, I put it to the common installation directory /usr/local/pear

4. After that, you will have this options to choose:

1. Installation base ($prefix)                   : /usr/local/pear
 2. Temporary directory for processing            : /tmp/pear/install
 3. Temporary directory for downloads             : /tmp/pear/install
 4. Binaries directory                            : /usr/local/pear/bin
 5. PHP code directory ($php_dir)                 : /usr/local/pear/share/pear
 6. Documentation directory                       : /usr/local/pear/docs
 7. Data directory                                : /usr/local/pear/data
 8. User-modifiable configuration files directory : /usr/local/pear/cfg
 9. Public Web Files directory                    : /usr/local/pear/www
10. Tests directory                               : /usr/local/pear/tests
11. Name of configuration file                    : /Users/gullele/.pearrc

Ideally, you can put the binaries anywhere you want but you would have to add it to the PATH to be able to access it from anywhere. But if you put it inside /user/local/bin that would automatically be taken care of – do that and that would pretty much take you to the end of pear installation.

Happey PEARing

External screen rotation on Mac book pro lion

It is customary to have more than one screen if you are a developer. On mac, I like to work on my external monitor being vertical while the main mac screen being on horizontal.

To do that, here is what you would do..

1. go to settings and produce this page

display


2. Hold Alt+command and click on Displays
3. you will get a box with rotation option on it:

rotate


4. Then select 90 from the rotation drop down menu and accept the confirmation.

Now restart your mac

After you restart it and when you go to display again you will see the rotation drop down manu by default there.

Untill now the main screen is the one being rotated 90 degree, but you want the external one

5. By now you will see your main window being tilted 90 degree and the external hasn’t been changed yet. But when you go to the display, you will see the rotation drop down being there – without using alt+command

6. Change the main window back to standard.

7. when you open the display you will see two dialog boxes one for each monitor. Go to the other dialog box[the external one] and just change the rotation.

external


If you don’t get just close the display and open it again

that will be it!

mod_rewrite not working on mac. Enabling .htaccess problem on mac

As a PHPer you would know what the mod_rewrite is and what the .htaccess file is right? if not a bit of googling would shower with a bunch of tutorials.
Now to the point:)
Being on mac do the following to enable mod_rewrite
1. Check if the module is loaded.
Navigate to apache2 folder

cd /etc/apache2

and open the conf file

sudo vi httpd.conf

Now, search for rewrite and you will and to something like this one

LoadModule rewrite_module libexec/apache2/mod_rewrite.so

if it is commented out, that is if there is a #infront of it, uncomment it and exit
2. Being in the current file, search for AllowOverride and replace the “None” by “All”

3. Got to the directory /etc/apache2/users and open the conf file of your username. Like if your username is gullele, there would be file gullele.conf. Bing inside the file, search for AllowOverride and give it the value of “All”

now restart your server

sudo apachectl restart

Happy rewriting :)

Installing from dmg on mac from command line

you don’t have to do this from command line as there is slick User Interface to do it. Actually, the moment you download your dmg [disk image] and double click on it, it will mounted on your system and then you can drag the icon to the application folder and boom.. you are done on installing.
This is incase if you, for whatever reason, wanted it to be done from command line.

Let’s say you downloaded a file somefile.dmg
Go to your terminal, move to the downloaded file’s folder and type

hdiutil mount somefile.dmg

This will be accompanied by the /Volume/dis-image-name confirmation from the command line.
Now search move to the newly mounted disk and copy the app file to the /Applications

cp -R /Volumes/some-file-folder/somefile.app /Applications

Yup that is it!