Consuming SOAP tutorial – Using java eclipse

Consuming SOAP tutorial from java step by step

SOAP, Simple Object Access Protocol, is older and still usable protocol for exchanging messages between systems.

Since soap is xml based, it is language and operating system independent. You can publish a soap service through your wsdl using Java on Linux and you can consume it through PHP application running on windows.

These days, SOAP is a bit lagging behind RESTful services which are rather more of architectural approaches than being protocol by themselves.

This is a tutorial showing how to consume an existing SOAP service using java language.

For this example, I will use a WSDL published on http://www.webservicex.com/globalweather.asmx?WSDL

In this one, I use already established wsdl for weather related tasks.

Eclipse has a nice tool to make life easier to consume SOAP related messages and I will show you here step by step.

Consuming SOAP tutorial step by step

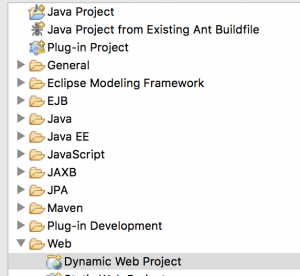
1. Go ahead and create a new dynamic java project on your Eclipse

dynamic java project

java project

dynamic web project

dynamic web project


Continue reading Consuming SOAP tutorial – Using java eclipse

sftp connection

connect to sftp from php

connecting sftp using php

What is SFTP
When to use SFTP
Automating SFTP
What to consider when automating
SFTP download using php code
SFTP upload using php code
List all files on SFTP Server

What is SFTP

SFTP, Secure File Transfer Protocol, is more applicable these days where cyber security is at its peak. Whenever possible, one has to use SFTP as the communications are encrypted.

Most of tools that are used for FTP like filezilla allows using SFTP with minor adjustment. SFTP has to be supported by the server that is providing the FTP server and usually uses different port than that of the FTP.

SFTP is pretty much like FTP as far the connection and usage is concerned. It has just another layer of security to make it more secure while uploading and downloading the file.

Basic server address, username, password and port are still necessary to connect and interact with SFTP server.
Continue reading connect to sftp from php

jQuery Select Option from Json

jQuery select option population using json as data source

jQuery select option tutorial will show how you can glue together the following terms together

  • select box
  • JSON
  • jQuery
  • *Javascript

* You might ask isn’t jQuery javascript? Yes indeed you are right, but jQuery is a framework making javascript programming a lot easier.

When I say plain javascript, or as some are calling it old school javascript, I meant to use the same task without using jQuery.

What select box is and types of select box options

Select box is one of the most used HTML element along with text input, radio option and the like.

Select box will allow you to provide dropdown options where you can select one or more items from it. You can make the select box to allow multiple selection using multiple attribute


Continue reading jQuery Select Option from Json

Passing composite object parameter to jersey in Restful Java web

How to pass complex object parameter to jersey

In this tutorial, I will try to show how to pass composite object as a parameter to jersey’s endpoint java application.

It seems like you are working on RESTful API based java application. In that case, chances are high that you are working with jersey.

If you are not familiar with jersey, jersey is an implementation of JAX-RS APIs. Hence, it is a seamless framework by which API based java projects can be implemented.

As of this writing, the current version of jersey is 2.23.
Continue reading Passing composite object parameter to jersey in Restful Java web

J2EE Maven Eclipse Hello World Tutorial Part Two

Hello World Beginner Tutorial using J2EE and Maven

This is part two of J2EE application with maven continued from Part One.

If you haven’t accomplished J2EE with Maven tutorial, please first complete it by going here

Maven relies highly on the pom.xml file that we would put on the project root folder. Lets do that.

In this part of J2EE tutorial and Maven tutorial, we will proceed from creating a pom.xml file which is the heart of maven.

3 Create the pom and compile the project using maven.

3.a put the following pom file in the MavenEclipseJ2EE directory.
Continue reading J2EE Maven Eclipse Hello World Tutorial Part Two

how to get user input and process it in nodejs tutorial

This is a continuation of the tutorial started on node js angular and mongo db shown on
node js console tutorial

Now we have advanced a bit more and have served an html file from node js in this tutorial.

It would be a matter of updating the html file to have the user input box and adding one more route in node js to wait for specific url, getting the input and posting back the processed data.

In this part, the app will accept a name from the user and will print an email address containing the name that is provided.

How to get input from the user

If you have followed this tutorial, start from number 4

1. create a directory node-input

2. move to that directory and issue the following command to install express in it

sudo npm install express

3. The above command would install express package in node_modules folder. This is the folder where all third party packages would be stored.

4. create server.js file in the folder node-input and add the following snippet in it.


 var express = require("express");
 
 //use the application off of express.
 var app = express();
 
 //define the route for "/"
 app.get("/", function (request, response){
     response.sendFile(__dirname+"/views/index.html");
 });
 
 app.get("/getemail", function (request, response){
     var firstname = request.query.firstname;
 
     if (firstname != "") {
         response.send("Your email address is " + firstname + "@gullele.com");
     } else {
         response.send("Please provide us first name");
     }
 });
 
 //start the server
 app.listen(8080);
 
 console.log("Something awesome to happen at http://localhost:8080");

5. create a folder views in node-input folder

6. create index.html inside views and add the following code in it


<html>
    <head>
        <title>Simple hello world</title>
        <style>
            .prompt {
                font-size: 16px;
                color: brown;
                font-weight: bold;
                margin-bottom: 5px;
            }
            .container {
                width: 50%;
            }
            .left-pane {
                width: 50%;
                float: left;
            }
            .right-pane {
                width: 50%;
                float: right;
            }
            .submit-name {
                clear: both;
            }
        </style>
    </head>
<body>
    <h1>Hello Node JS</h1>

    <form method='GET' action="/getemail">
        <div class="container">
            <div class="prompt left-pane">
                <span>Give us your firstname and get email address</span>
            </div>
            <div class="right-pane">
                <input type="text" id="firstname" name="firstname" />
            </div>
        </div>
        <div class="submit-name">
            <input type="submit" value="get the email" />
        </div>
        </div>
    </form>
</body>
</html>

7. Save this file and start the sever using

node server.js

8. Now go to browser and surf http://localhost:8080

As you can see, the main point here would be adding one more route app.get("/getemail", function (request, response){ and accessing the parameters using the request object then passing the response with processed name in it.

The next would be to see how node can accomplish rendering the next page with values. And for that, there is a need to have template engine introduced.

Next: Using template engine ejs with node js

how to display html files from node js example tutorial

This is a continuation of the tutorial started on node js angular and mongo db shown on
node js console tutorial

Here We have see how to print a Hello World for a request of “/”. That is a good advancement but that won’t give us much to proceed. We need a way to server html files for different requests.

So, what we want to do is to have more flexibility by having html file. We will have all the contents as we wish using the old school html tag and we will serve that through node js.

Displaying and rendering html file through node js

If you have followed this then start from number 4

1. create a directory node-input

2. move to that directory and issue the following command to install express in it

sudo npm install express

3. The above command would install express package in node_modules folder. This is the folder where all third party packages would be stored.

4. create server.js file in the folder node-input.


 var express = require("express");
 
 //use the application off of express.
 var app = express();
 
 //define the route for "/"
 app.get("/", function (request, response){
     //show this file when the "/" is requested
     response.sendFile(__dirname+"/views/index.html");
 });
 
 //start the server
 app.listen(8080);
 
 console.log("Something awesome to happen at http://localhost:8080");

5. create a folder views in node-input folder

6. create index.html inside views and add the following code in it


 <html>
 <head><title>Simple hello world</title></head>
 <body>
 <h1>Hello Node JS</h1>
 </body>
 </html>

7. go to your browser and type http://localhost:8080

You will see Hello Node Js on the browser big and bold.

What is going on

It is like the previous example except we are serving the actual physical html file this time.

By doing so, we have more control on the html file like adding css and javascript codes or calling those files on the page.

Mind you, index.html is the entry point, once we got on that page, we can navigate to other pages and do more

**If the above app is not working for whatever reason, make sure to update npm and get newest version

npm i -g npm-check-updates
npm-check-updates -u
npm insert

Next: Accepting input from the user and processing it.

using express package in node – installation and usage example tutorial

This is a continuation of the tutorial started on node js angular and mongo db shown on
node js console tutorial

By far, you have seen how to write to the console and to display hello world through web using node.

But, showing simply Hello World is not that interesting and fun at all. And it doesn’t show anything that simulates real world example of accepting input from user and processing that.

Before doing that, lets see the express package which would enable us to do that.

installing express package and creating a page with input boxes.

1. create a directory node-input

2. move to that directory and issue the following command to install express in it

sudo npm install express

3. The above command would install express package in node_modules folder. This is the folder where all third party packages would be stored.

4. create server.js file in the folder node-input.

5. add the following code into server.js file.


 var express = require("express");
 var app = express();
 
 app.listen(8080);
 
 console.log("Something awesome to happen at http://localhost:8080");

6. Go to command line and start the web server, by now we know how to start the web server as

node server.js

Now you will see something interesting when you go to browser and type http://localhost:8080.

This time you would get Cannot GET / Unlike the previous time.

What is going on

express is framework that would make life way easier for the http communication between the nodejs server and whoever wants the request.

Among other things, it handle the http verbs, GET POST, DELETE, PUT, also it make the routing very easier. That is when you want to access some pages with something like http://gullele.com/list or http://gullele.com/register. That means the /list and /register are handles through routing mechanisms of express.

Ok, lets fix the that “Cannot GET /” error.

Update the server.js as follows

                                                                                                                                                                        
 var express = require("express");
 
 //use the application off of express.
 var app = express();
 
 //define the route for "/"
 app.get("/", function (request, response){
     response.end("Hello World");
 });
 
 //start the server
 app.listen(8080);
 
 console.log("Something awesome to happen at http://localhost:8080");

Now you will see Hello World on your browser when you type http://localhost:8080.

This time, we have created a router to response when the user lands on the root of the website.

Next: Serving html files from node js

a hello world tutorial using node js with http web server

This is a continuation of the tutorial started on node js angular and mongo db shown on
node js console tutorial

In order to have simple website that is displaying hello world, we need to have a web server. In the previous example there was no need to have a web server since the message was shown from command line.

Node provides its own web server that we can serve http request and responses.

I will cover on the later tutorial how those would be used, for now. All we need is to be able to go to http://localhost:8080 and see the the output of hello world

Serving the page through web server

If you have followed the above tutorial listed on the link, start from number 3.

1. Create a folder in your computer and name it as node-tutorial

2. In the node-tutorial folder create server.js file

3. On server.js add the following code in it and save it.


 var http = require("http");
 var server = http.createServer(function (request, response) {
 response.writeHead(200, {"Content-Type":"text/plain"});
 response.end("Hello World");
 });
 
 server.listen(8080);
 
 console.log("Something awesome to happen at http://localhost:8080");

4. go to your browser and type http://localhost:8080 and you will see Hello World being printed on your browser.

Congratulations! you have successfully created a website that prints Hello World.

What is going on

The above snippet creates a very basic yet full fledged web server. At the heart of any web server are request and response

request is what the browser behalf of the user is sending to the server and it waits for the server to give it back something to show to the user. The request is the one that contains the form elements usually

response is what the server would be responding based on the request forwarded to the server. It contains usually the type of the response data, like text or json or image through its header and the actual data to be returned.

require("http"); This part tells node to import the http package for usage.

With the hello world example above, the request contains no input fields but it is full request in that it is requesting for the response of hello world.

Don’t worry if you don’t get much of the request response stuff, as it would be clear on the upcoming parts of this tutorial.

Since simply printing Hello Worlds is not that much fun. We will see how to do some other exciting stuffs on the upcoming parts of tutorials.

Next: Accept input from the browser/user and process the input

node js mongo db and angular js tutorial for beginners from scratch

node js beginner guide with mongo and angular

node js step by step tutorial showing you how to create a full fledged node js angular js and mongo db for beginners who have never played with these technologies or played partially independently but not all those technologies together.

I assume installing nodejs to your computer can be found easily and I will not go through that.

Starting with a simple Hello world display with webserver

Node js is a fully functional webserver and processor that is created off of Googles V8 engine. It is very light weight and the syntax is javascript syntax.

Unlike other languages where you have to setup and configure a different independent webserver, node js, comes with a total self contained web server serving at ports that you can assign. Which makes it a full one stop web application.

For comparison, when working on php might require you to setup a different webserver like Apache or IIS.

In this part, I will show a very simple old school hello world example to be done in node js.

In the upcoming tutorials, you will see how to change those step by step.

Hello world in node js

1. Create a folder in your computer and name it as node-tutorial

2. in the node-tutorial folder create hello.js file

3 on hello.js add the following code in it.

console.log("Hello World");

Then save the above file and run the file as

node hello.js

This will print Hello World in the CONSOLE.

What did happen

The above code is running from the node js as a command line code. There is no any web server, that making it available through browsers per se, this time, it will just print that on right on the terminal you are running it.

You might know console.log() from your javascript coding and it is doing the same task here in node as well.

Next: Run Hello World using http through browser