Simple Servlet example without eclipse

Simple servlet example – how to create servlet without eclipse

These days we are all surrounded by heavy frameworks that make life easier for us. Like maven, spring and hibernate and more. But how can we create a simple servlet website without the need of all those.

The main idea of servlet lies around very simple and intuitive files and structures. Knowing those only is good enough to built a good web app and that is what I will be showing here.

The main parts of the java web app are the following.

1. The Servlet – the java class that is handling the POST and GET http verbs
2. the deployment descriptor – web.xml. File telling how the webapp should be interacted like the url pattern
3. Servlet jar file – This is the jar handling the magic of interaction with the web for the servlet.

Structure of the webapp

Running maven project in eclipse step by step

If you have java web project that is maven based, and you want to run the project in eclipse here are the steps.

Mind you this is for the project which is already a maven project, say you did it through terminal or you got it from other repository and you want to run it locally through eclipse.

Assumed -> you have setup the webserver like tomcat on eclipse.

1. Go to Eclipse Run->Run Configuration

2. Double click on M2 Maven Build

3. On the base directory: insert ${project_loc}

4. On the goals: insert tomcat:run and the select and apply

5. Right click on the project and select configure->Convert to Maven Project

configure build path

configure build path

6. Again right click on the project and select Maven->Update Project

update-project

7. For further pulling the dependencies from maven to eclipse, right click on it->properties->Deployment Assembly

8 Click on Add button and select Java build path entries and select Maven Dependencies

9. Now, your dependencies should be pulled all is ready for testing. Go to project menu and click on build project. This will be inactive if Build Automatically is selected.

10. Then to test, right click on one of your servlet and select run as and click on the server option. If all went good, you should be able to see the output from your servlet on the browser.

The above simple steps would allow you to convert the Java web project into maven project in eclipse.

See: How to change directory structure for maven

See: Resolving classpath problem in eclipse

Importing packages to eclipse added by maven to java web project

If eclipse is having a hard time acknowledging the packages you got through maven, here are the step by step fix for it..

1. Go to your projects root, where the pom.xml resides

2. issue mvn eclipse:clean

3. issue mvn eclipse:eclipse

4. this could be optional, on eclipse go to the project, right click on it and select build project

resources can not be added

eclipse j2ee error There are No resources that can be added or removed from the server

Eclipse showing There are No resources that can be added or removed from the server when adding project

If you are trying to test the java web application (j2ee) on your local machine with built in eclipse support and getting error, then it is related to project facet.

Here is how you can solve the error There are No resources that can be added or removed from the server coming from eclipse

1. right click on your web project in eclispe

2. Select properties
properties

3. Select Project facets
project-facets

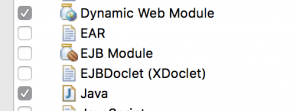
4. Select Dynamic Web Module
select-dynamic-web-module

5. Click on apply and then click on OK

This will solve the problem.

See also: How to resolve class pass error when working with maven

Debugging PHP app using xDebug and Eclipse Tutorial

This will be a tutorial on how to debug a PHP application using xDebug and eclipse.

1. Get the eclipse for php from Eclipse for php
A side note, if you are on any *nix OS, this might require you to update your java to 1.7 and above. If that is the case, download latest Java JDK from Oracle (1.8 at the time of writing) and do:

which java

in most cases, this will show /usr/bin/java which is a symlink to the actual java binary.
Follow the symlink using

ls -la 

That depending on the destro you have, would point to the link destination, there you can point to the java symlink to

ln -s /path/to/the/downloaded/jdk/bin/java

That should take care of the problem.
On windows, you need to updateh environment variable that you set for the JAVA_HOME. Googling on this shall give you the right direction.

2. Get xDebug on your system
Well, before this you might need the whole stack of apache, or any other php-approved webserver, and php itself. For that if you are on *nix you can use

sudo apt-get install lamp-server^

On windows, you can use wamp server and be done with it.

To install xdebug on *nix

sudo apt-get install php5-xdebug

Once you do that, restart your apache server

service apache2 restart

and do phpinfo(); you should be able to see the xdebug info there.

Now, pull your php.ini and add the following to it

[xdebug]
xdebug.remote_enable=on
xdebug.remote_handler=dbgp
xdebug.remote_port=9000

You can alternately add this info in the xdebug.ini if it it exists in the additional ini folder. This information would be available on the phpinfo();

Again restart your apache web server.

For testing purposes I have created a simple yet good php example on https://github.com/gullele/simple-php-calculator-example

Go to your eclipse Run>Run Configurations..
and do the following on respective tabs
For server tab:
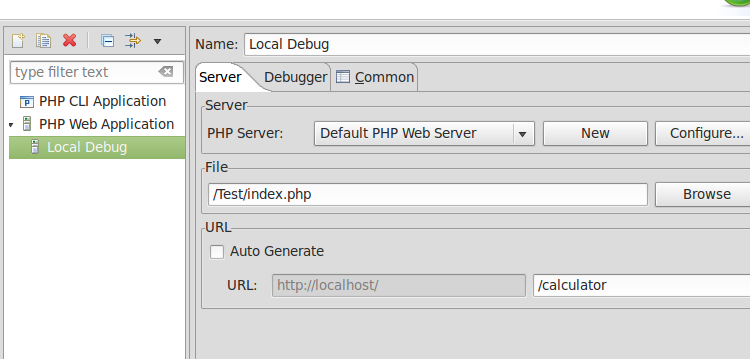
server
For Debugger tab.

debugger

Now your eclipse is ready for debugging!
You can put a break point by double clicking on the area you would like the debugger to stop.
As you can see, I was able to see the value assigned on the $config variable that is was read from config.ini file.
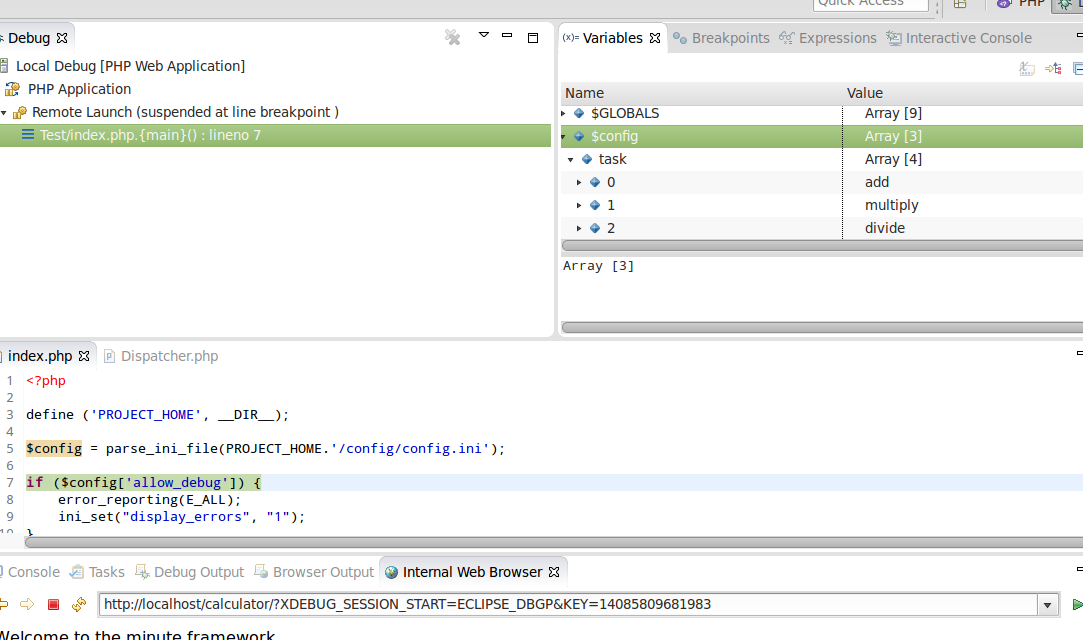
debugprogress

SVN integration to Eclipse setup and error – unable to load default svn client

-startup
plugins/org.eclipse.equinox.launcher_1.0.201.R35x_v20090715.jar
–launcher.library
plugins/org.eclipse.equinox.launcher.gtk.linux.x86_1.0.200.v20090520
-showsplash
org.eclipse.platform
–launcher.XXMaxPermSize
256m
-vmargs
-Djava.library.path=/usr/share/java/
-Djava.library.path=/usr/lib/jni/
-Xms128m
-Xmx512m
-Dorg.eclipse.equinox.p2.reconciler.dropins.directory=/usr/share/eclipse/dropins

http://subclipse.tigris.org/update_1.6.x – depends on what eclipse you have – check this for compatibility. how do i know what version i have.

sudo apt-get install libsvn-java

default path /usr/lib/eclipse/eclipse.ini

http://ubuntuforums.org/showthread.php?t=916633

One of prevailing repository tools is SVN. I like and use it. I am also a fun of eclipse. The two would make programming cool.

To install SVN in eclipse

Go to http://subclipse.tigris.org/ and see the download and install link. Check which to install based on the Eclipse version – which is depicted on the page.

Install JavaHL

From your command line in Linux: sudo apt-get install libsvn-java.
This is the major factor for the unable to load default svn client error.

Finally

Update your eclipse.ini by adding this line just next to -vmargs at the end
-Djava.library.path=/usr/share/java/
-Djava.library.path=/usr/lib/jni

The location of eclipse.ini would be in your installation folder. The default location for eclipse which loaded from package would be /usr/lib/eclipse/eclipse.ini

Now, restart your Eclipse and enjoy SVNing.

Adding Java Project to new Java web application on Eclipse

I just wanted to add my existing Java project to the current java web project and here is the simple step actually [of course from Eclipse :) ]

1. Right click on the web project and select Properties
2. Select J2EE Module Dependencies
3. Here either you can select the project which resides in the eclipse workspace or you can import additional external jars.
4. Apply OK
5. Right click web project and select Build Path -> configure
6. On the projects tab, select the project tab
7. Click Add and select the project that you would like to add
8. OK.
You are done! It is advisable if you clean your project and build a new one

To to do this:

Go to project -> clean and select your project
Select start a build immediately
Select build only the selected projects

After this reboot your Application Server – and enjoy with your imported project.