Points on Oracle MySQL Associate Certification Exam

Certification is one way to keep on top of your expertise. It would help you to communicate easily, meet expectations. When you take certification, it is entirely for your own. No one, specially these days, will take certifications for granted. Still you will go thru a number of interviews and code challenges to show who you are. But, when there are times that all of us are the same colored potato, certification will rescue us by making us a bit bolder than the others.
Also, take the challenge. If you are working on some technology and you think you are expert on it, proof it thru certification.

I took the exam yesterday and it was cool. It was not that difficult to tell the truth. Here are some of my points that would help you if you are thinking to take that exam.

1. Are you a developer who is working on mysql as a backend and have done a number of selects, joins, where statements, group by and havings? How about querty statements like create table, alter table, add index and show databases/table..? If the answer for this questions is ‘Yes’ – congrats my friend, almost you have answered a bit more than half the questions on the exam already.
The exam’s most portion is on DML and DDL. If you have a good hands on those query types all you have to do is to get the grip on the principles behind those. Actually this will help you in general not for the exam only
Like, what are basic blocks of select statements, when do you use indexes, group bys and havings, how are the results of the query be affected? When to use Order by and limit. Practice with a number of queries with real tables..

2. Get this book – MySQL-5-0-Certification-Study-Guide. You will need only this book indeed. Read the part for the developer PartI and read on views, import and export and you will be pretty much set.
Guess what, this book is the same book you will need when you take the MySQL Developer exam I and II, which I am planning to take in the coming couple of weeks.

3. Do the exercises from the book’s CD. it has a concise exercises for each chapter and they are the best. Make sure you cover those before jumping to the exam.

4. Give it at least two weeks. It might depend on how you are prepared, but the more prepared the more walk in the park it would be.

5. Apply the general test rules 🙂 – take a good rest before you sit for the exam, eat appropriately [dont be hungry and don’t be too loaded as well], make sure you visit the bathroom first 😉

*For me applying all those points appropriately, I was able to finish the exam way ahead of the allotted time, and score 94% – which shows those guidelines are good to follow.
the requested PHP extension mongo is missing from your system.

Got this error when trying to add the mongodb stuff your php project – specially using composer then here is how to solve it.

The first thing is you have to add the mongodb driver to php.

You might need PEAR on your system. Adding pear to your system is relatively easy and google can help on that.

Then do the following on your terminal

sudo pecl install mongo
pecl install mongo

The last lines of successful installation would tell where the installation has occurred and some more important information.

Now you need to add the mongo.so to the php.ini

if you don’t know where you have php.ini run (on ubuntu)

locate php.ini

then run

echo "extension=mongo.so" >> path-to-php.ini

Installing PEAR in Mac OSX

It looks the days of PEAR are somehow covered by the era of composer. But, still there might be things we will depend on PEAR, hence we have to install it.

Are you on Mac OSX and wants to install PEAR.. follow these simple steps and you will nail it

1. download the phar file from go-pear.phar

curl -O http://pear.php.net/go-pear.phar

2. Then run the phar file

sudo php go-pear.phar

In some cases, you might want to run it with -d detect_unicode=0 option
3. You will be provided with option that would look like the following:

1. Installation base ($prefix)                   : /Users/gullele/pear
 2. Temporary directory for processing            : /tmp/pear/install
 3. Temporary directory for downloads             : /tmp/pear/install
 4. Binaries directory                            : /Users/gullele/pear/bin
 5. PHP code directory ($php_dir)                 : /Users/gullele/pear/share/pear
 6. Documentation directory                       : /Users/gullele/pear/docs
 7. Data directory                                : /Users/gullele/pear/data
 8. User-modifiable configuration files directory : /Users/gullele/pear/cfg
 9. Public Web Files directory                    : /Users/gullele/pear/www
10. Tests directory                               : /Users/gullele/pear/tests
11. Name of configuration file                    : /Users/gullele/.pearrc

Select 1 and enter where you would want to put the installation. In my case, I put it to the common installation directory /usr/local/pear

4. After that, you will have this options to choose:

1. Installation base ($prefix)                   : /usr/local/pear
 2. Temporary directory for processing            : /tmp/pear/install
 3. Temporary directory for downloads             : /tmp/pear/install
 4. Binaries directory                            : /usr/local/pear/bin
 5. PHP code directory ($php_dir)                 : /usr/local/pear/share/pear
 6. Documentation directory                       : /usr/local/pear/docs
 7. Data directory                                : /usr/local/pear/data
 8. User-modifiable configuration files directory : /usr/local/pear/cfg
 9. Public Web Files directory                    : /usr/local/pear/www
10. Tests directory                               : /usr/local/pear/tests
11. Name of configuration file                    : /Users/gullele/.pearrc

Ideally, you can put the binaries anywhere you want but you would have to add it to the PATH to be able to access it from anywhere. But if you put it inside /user/local/bin that would automatically be taken care of – do that and that would pretty much take you to the end of pear installation.

Happey PEARing

asadmin-command-unknown-in-glassfish-ee-application

am a great user of tomcat when it comes to Java web application. I had fun with it. Being fast and allowing a bunch of things to be done by myself.. that being said, I am a regular user of glassfish as well. Specially the later version 3 looks awesome in a lot of ways..

I will try to use this blog to amend any hiccups whenever they appear and a bit of more tutorials as well.

The first one is the command line friend asadmin.

On the new version it will be found on

/glassfish-main-directory/glassfish3/glassfish/bin

Being on this directory if you issie

./asadmin

You will get the command line for it.
To add it to your path so that you can use it from any where in your terminal, just add it to your path

open your ~/.bash_profile or .bash_rc [create it if it doesnt exist and add the above directory at the end of it separated by appropriate directory separator.

That is it..

External screen rotation on Mac book pro lion

It is customary to have more than one screen if you are a developer. On mac, I like to work on my external monitor being vertical while the main mac screen being on horizontal.

To do that, here is what you would do..

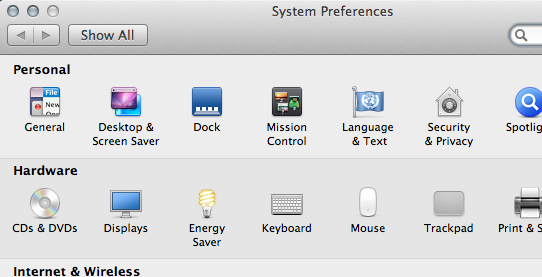
1. go to settings and produce this page

display


2. Hold Alt+command and click on Displays
3. you will get a box with rotation option on it:

rotate


4. Then select 90 from the rotation drop down menu and accept the confirmation.

Now restart your mac

After you restart it and when you go to display again you will see the rotation drop down manu by default there.

Untill now the main screen is the one being rotated 90 degree, but you want the external one

5. By now you will see your main window being tilted 90 degree and the external hasn’t been changed yet. But when you go to the display, you will see the rotation drop down being there – without using alt+command

6. Change the main window back to standard.

7. when you open the display you will see two dialog boxes one for each monitor. Go to the other dialog box[the external one] and just change the rotation.

external


If you don’t get just close the display and open it again

that will be it!

file upload

multiple file upload in Symfony2 example

Multiple File Upload in Symfony framework

I spent decent amount of time to put together the multiple file upload in symfony.

It is not that difficult actually but the problem is there is no direct/easy documentation or tutorial on it.

On the form type where you would build the form, have the files with the type of collection and make its type a file entity. In this case there would be two file types by default.

    public function buildForm(FormBuilderInterface $builder, array $options) 
    {
        /*
         * The file does not need to be added as "file" because it is referred
         * in the validation for File and SF will automatically know it is file.
         */
        return $builder
                ->add("files", 'collection', array(
		    'type'=>new FileType(),
		    'allow_add'=>true,
		    'data'=>array(new BundleEntityFile(),
		    new BundleEntityFile())
		))
                ->add('save', 'submit');
    }

    public function getName()
    {
        return "files";
    }
}

The trick is on adding the files as collection. Initially, we have two file inputs and their type being FileType.

The allow_add is important to be able to add files through javascript.

The javascript would look like:

/*Handling multiple picture upload*/
$('#add_pictures').click(function(){
    var total_files=$("#member_pictures_container li").length;
    var file_label=document.createElement("label");
    file_label.innerHTML="File";
    file_label.for="PhotoAndDescription_files_"+total_files;
    var div_file=document.createElement("div");    
    div_file.appendChild(file_label);
    var picture= document.createElement('input');
    picture.name="PhotoAndDescription[files]["+total_files+"][file]";
    picture.type="file";
    picture.id="PhotoAndDescripton_files_"+total_files;
    div_file.appendChild(picture);
    div_container=document.createElement('div');
    div_container.id="PhotoAndDescription_files_"+total_files;
    div_container.appendChild(div_file);
    var list_element=document.createElement('li');
    list_element.appendChild(div_container);
    $('#member_pictures_container').append(list_element);
});

FileType would look like:

class FileType extends AbstractType
{
    public function buildForm(FormBuilderInterface $builder, array $options)
    {
        return $builder->add("file", "file");
    }

    public function getName()
    {
        return "filetype";
    }

    public function setDefaultOptions(OptionsResolverInterface $resolver)
    {
        $resolver->setDefaults(array(
            'data_class'=>'BundleEntityFile',
            'csrf_protection'=>true,
            'csrf_field_name'=>'_token',
            'intention'=>'file'
        ));
    }
}


And the twig file would look like this one

{{form_start(form)}}
    {{ form_errors(form) }}
    {{ form_widget(form.about_member) }}
    • {% for file in form.files %}


  • {{ form_errors(file) }} {{ form_widget(file) }}


{% endfor %} {{form_end(form)}}

Pretty much this will take care of the multiple file handling in symfony2. As I mentioned earlier, it is not that difficult but the lack of documentation has made it so..

Do you know what to check to deploy Symfony app?

What is POST and HTTP-RAW-POST and php input has to do with enctype? Find out here

node js server downloads text/html as file on browser

Those of you who work with webserver, like apache, might already have seen that problem – like the php file that was intended to display content would be downloaded as file.. this has some fix on configuration right..
Now coming to node js, once you install the server like

  1 var http_server=require("http");
  2 http_server.createServer(function(request, response){
  3     response.writeHead(200, {'Content-Type': "text/html"});
  4     response.write("I am listening @port 8896");
  5     response.end();
  6 }).listen(8896);

This should run fine once you run node filename.js where filename.js is the file containing the above code.
but, when you try to run by going to localhost:8896 and in place of seeing the text on your browser, if the browser decided to download the file, give a a careful look at line number 3 to be sure that you have specified correct content type..

Sorting array by two fields in PHP

assume you have the following array:

$arr=array(
	array('field1'=>108, 'field2'=>'some'),
	array('field1'=>200, 'field2'=>'zen'),
	array('field1'=>105, 'field2'=>'bar'),
	array('field1'=>100, 'field2'=>'foo'),
	array('field1'=>200, 'field2'=>'yellow'),
	array('field1'=>200, 'field2'=>'any'),
);
How would you approach if you want to sort the array first by field1 and then by field2. That is sort the array by field1 but for field1 values that are same, sort by field two.. just like the SQL equivalent of ORDER By column1, colum2..

usort($arr, function($a, $b){
	if ($a['field1']>$b['field1']){
		return 1;
	}elseif($a['field1']<$b['field1']){
		return -1;
	}else{
		return strcasecmp($a['field2'], $b['field2']);
	}
});

Symfony file upload SplFileInfo::get error

Working on Symfony form that has a file upload and got the above error when I try to save it.
The form is build from entity which has the following format:

class MemberFile
{
    /**
     * SymfonyComponentHttpFoundationFileUploadedFile object
     */
    protected $file;
    /**
     * @ORMId
     * @ORMColumn(name="file_id", type="integer")
     * @ORMGeneratedValue(strategy="AUTO")
     */
    protected $fileId;
    
    /**
     * @ORMColumn(type="string", length=255)
     */
    protected $path;
   // additional member variables and getters and setters goes here...
   .....
    public function upload()
    {
        if (null === $this->file)
            return;
        $this->getFile()->move(
                $this->getUploadDir(), $this->file->getClientOriginalName()
        );
        $this->setSize($this->file->getSize());
        $this->setFileType($this->file->guessExtension());
        $this->path=$this->file->getClientOriginalName();
        $this->file=null;
    }
}

And the form is constructed inside the controller in such a way

$member_file=new MemberFile();
        $form=$this->createFormBuilder($member_file)
                ->add("file")
                ->add("save", 'submit')
                ->getForm();

Right after the appropriate action is requested, I called $member_file->upload() after validation to get the above error..

How I solved it..
1. I checked if the file has been properly uploaded despite the error
-> yes it was uploaded
2. Checked if the original tmp file is still intact –
-> NO and BINGO!
Since the file has been moved, the subsequent operations on $this->file can not be done appropriately.
Solution
Just move those operations before you call move file..

    public function upload()
    {
        if (null === $this->file)
            return;
        $this->setSize($this->file->getSize());
        $this->setFileType($this->file->guessExtension());
        $this->path=$this->file->getClientOriginalName();
        $this->getFile()->move(
                $this->getUploadDir(), $this->file->getClientOriginalName()
        );
        $this->file=null;
    }